
In this post, learn the basic features of Sales Navigator for Salesforce. Learn the menu bar icons, view a brief description of their functions, and learn how to import Salesforce data.
Initial Launch Screens
The first screen you will see when you launch Sales Navigator for Salesforce, is a login screen. Log in with your Salesforce credentials to get started.

Next, you will be asked to import contact groups from your device’s address book. Choose groups to sync with the app or tap ‘Done’ to continue to the app without import.

Navigating the App
Once Sales Navigator has finished mapping synced contacts, you will be brought to the app. All appointments in iCal and all Salesforce tasks will automatically appear in Sales Navigator. Location based tasks and calendar appointments will be shown as a route on the map.

Icon Key: Menu Bar
![]() Main Menu: tap this icon to open the main menu where you will find access to all features of the app.
Main Menu: tap this icon to open the main menu where you will find access to all features of the app.
![]() Salesforce Import/Sync Icon: tap the import icon to import Salesforce data. Import all standard and custom objects and import views created in Salesforce. Also, choose fields to import into groups. This is also where you will see the tally of recent activity with your Salesforce data. Tap this icon to manually sync this activity to Salesforce.
Salesforce Import/Sync Icon: tap the import icon to import Salesforce data. Import all standard and custom objects and import views created in Salesforce. Also, choose fields to import into groups. This is also where you will see the tally of recent activity with your Salesforce data. Tap this icon to manually sync this activity to Salesforce.
![]() Contact menu: tap this icon to view your imported contacts in a list view. Here, you will also find the different map views, such as radial search.
Contact menu: tap this icon to view your imported contacts in a list view. Here, you will also find the different map views, such as radial search.
![]() Group menu: tap the groups icon to view imported and custom groups of contacts. Here, you will also be able to create and edit custom/automatic Salesforce groups.
Group menu: tap the groups icon to view imported and custom groups of contacts. Here, you will also be able to create and edit custom/automatic Salesforce groups.
![]() Task Icon: tap the task icon to view your daily tasks. Tasks include email, phone, event, meeting and other. Create new tasks and set priority or status in this menu as well.
Task Icon: tap the task icon to view your daily tasks. Tasks include email, phone, event, meeting and other. Create new tasks and set priority or status in this menu as well.
![]() Trips Icon: tap the trips icon to see your daily routes in a list view with appointments and meeting tasks. Here, you can view directions between stops, your ETA, distance and travel time.
Trips Icon: tap the trips icon to see your daily routes in a list view with appointments and meeting tasks. Here, you can view directions between stops, your ETA, distance and travel time.
![]() Recent Activity Icon: tap recent activity to view all recently completed tasks.
Recent Activity Icon: tap recent activity to view all recently completed tasks.
![]() Sales Navigator Calling Keypad: Sales Navigator calling is an additional feature that is not included in a standard license. Contact us to learn more, sales@thecaseygroup.com
Sales Navigator Calling Keypad: Sales Navigator calling is an additional feature that is not included in a standard license. Contact us to learn more, sales@thecaseygroup.com
![]() Settings Icon: tap the settings icon to manage your account settings.
Settings Icon: tap the settings icon to manage your account settings.
![]() Circle View: Tap the circle view icon to quickly pull up the circle/radial view of your map
Circle View: Tap the circle view icon to quickly pull up the circle/radial view of your map
![]() Current Location Icon: this icon takes you to your current location on the map.
Current Location Icon: this icon takes you to your current location on the map.
![]() Map Settings Icon: this icon is where you will find all map settings including Standard/Satellite view and Filter by Address Label
Map Settings Icon: this icon is where you will find all map settings including Standard/Satellite view and Filter by Address Label
Importing Data from Salesforce
To start using Sales Navigator and visualizing your data on the map, you will need to import your standard or custom objects from Salesforce.
*Sales Navigator comes pre-configured with all standard objects (accounts, contacts, leads and opportunities). To configure custom objects or edit/delete the standard object configuration, you must do so using the Sales Navigator admin screens in your Salesforce org.
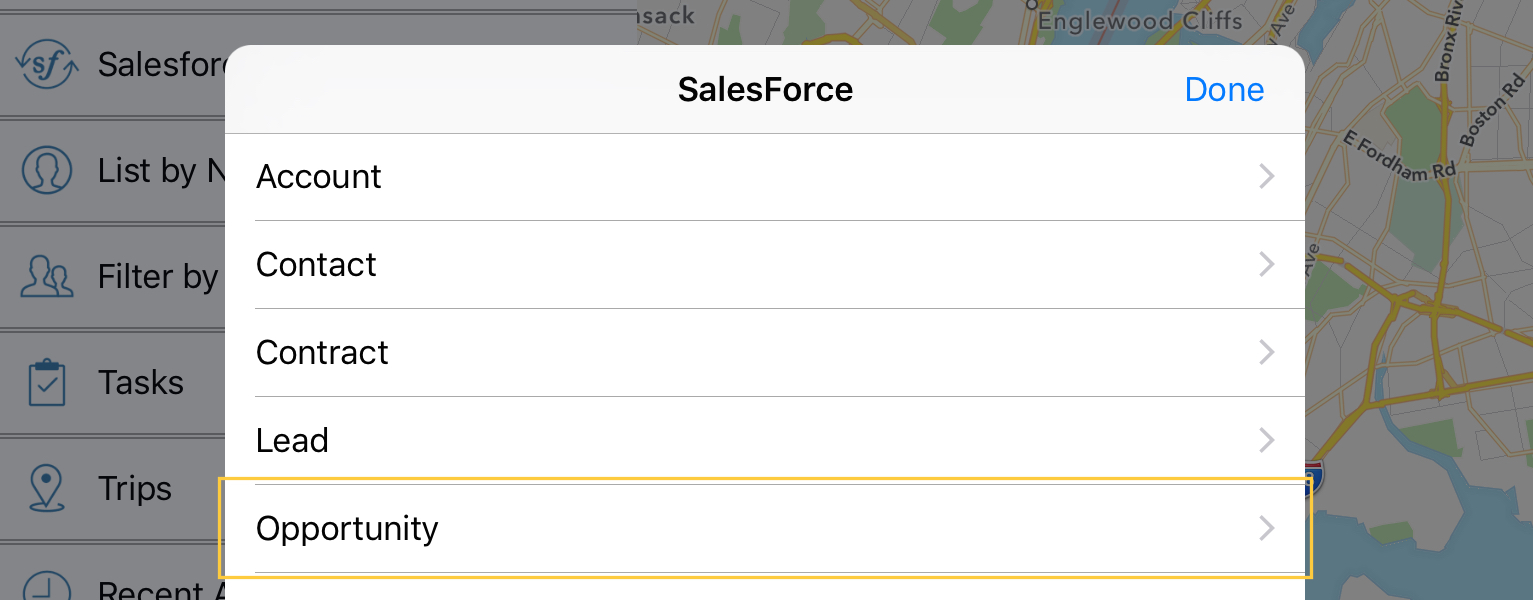
1. Tap the Import Icon ( ![]() ) on the menu bar. A screen like the one below will appear, showing you the standard and custom objects available for import.
) on the menu bar. A screen like the one below will appear, showing you the standard and custom objects available for import.
2. Tap the object you would like to import.
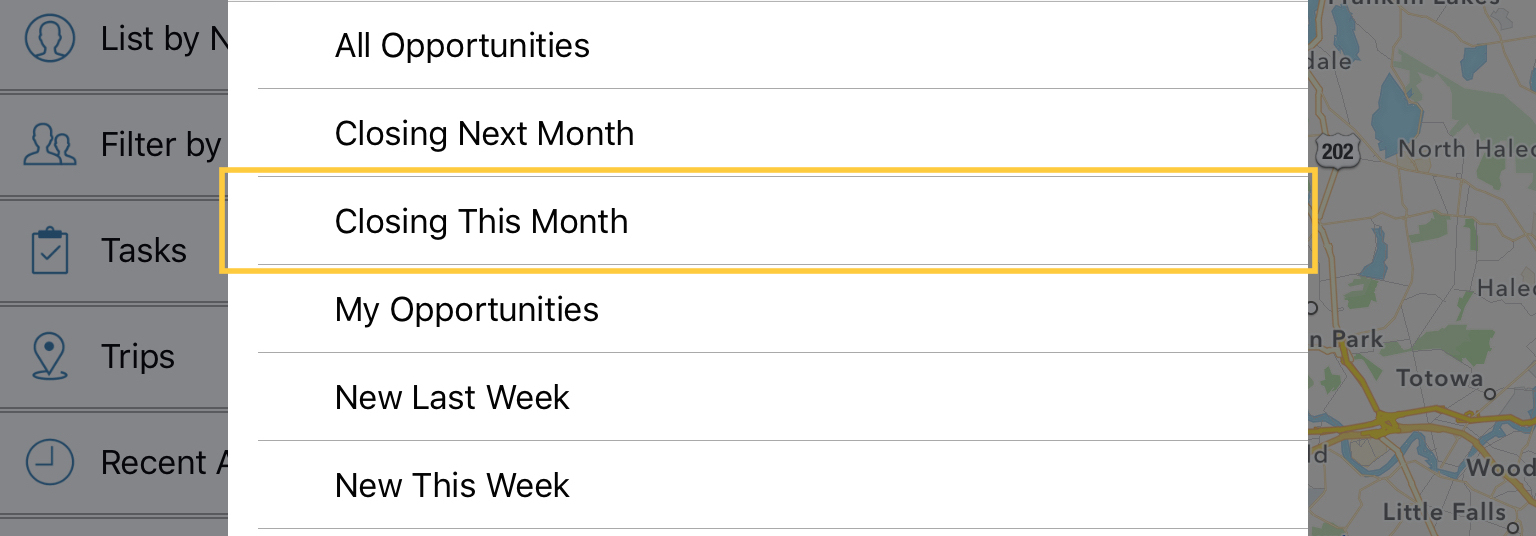
3. On the next screen, you will see views of opportunity objects set up in your Salesforce org. Tap on a view to import. *You can import any number of views into Sales Navigator.
4. On the next screen, tap ‘Import’ and Sales Navigator will begin mapping addresses.
5. You will now see red delete buttons next to imported views. Tap ‘Back’ and tap ‘Done to continue to the map.
*Imported views will automatically create groups in Sales Navigator. Turn groups on or off to visualize specific contacts on the map.
Thanks for using Sales Navigator for Salesforce! Please contact us with any feedback or questions!